For my idea I wanted to keep it simple, I wanted to show the viewer a little more of who I am and what i'm interested in, I believe I have achieved this goal and demonstrated various techniques that I have learned and obtained through tutorials and my own research. If given the opportunity to do this again I probably would try and utilize the empty space a bit more and perhaps make the video a lot more interactive and also experiment with different font styles. In terms of color that is one thing that I have considered and applied to my work as well as typography to make up for the loss of sound which is something I think I successfully achieved. Although at times it was quite difficult at time with trying to fill each screen with content that would perfectly reflect each activity.
Time Art Progress - Effects used With a little help from the tutorials I watched and also the tutorials we learned with Simon in previous lessons I really wanted to try apply the skills that I learned towards the Time Art video . http://atomlintimeart.blogspot.co.uk/2014/01/after-effects-introduction.html
For example using the image above for the middle screen showing me listening to music I wanted to display musical notes that will appear, just to make the visuals look a lot more genuine and believable. In order to do this I made multiple copies of musical notes and then placed key frames on each layer and adjusted the scale for each music note. So as it appears multiple musical notes will appear in different sizes moving around the screen.
(Musical notes- key framing)
I made a late change to my idea and how it would end and decided to include a little more humor and comedy to the video. Similar to the tutorial given to us by Simone about manipulating objects using key framing, I wanted to attempt to do the same
I recorded a few test shots for my film and decided to chooses 3 activities which I moat enjoy doing, playing FIFA listening to music and studying, now I wouldn't say studying is the most enjoyable but it's an activity that I do quite frequently. I started to consider the background and what you see around me (the subject) and how that may compliment the activity and also reflect myself. I watch a lot of Youtuber video's about gamer's and vlogger's and I wanted to do some research and see how they interact in there videos and also how they are positioned in the frame.
Here are the videos I uploaded, I wanted to make sure that It looks like they are shot in different times of the day, of course referring to the brief with incorporating the essence and element of 'Time'. So I brought the footage to After Effects and started to experiment with different ways in which I can help emphasize each activity.
I initially started with adding a FIFA football video into the screen so it looks more like I'm actually playing, it mskes it look a lot more realistic I also started playing with keyframes and different ways I can introduce text and images.
(using keyframes)
I swiftly came to the conclusion that It would be quite difficult adding this video file onto the image due to the restricted space when the image is cropped.
For my time art project I want to keep it simple so I decided to record different events which take place during my day during different times. All different activities which I personally enjoy doing, I feel like that's a good way of conveying who I am and also acknowledging my interests also. I also want to make sure that I include some affects in After Effects such as track motion key frames and experimenting with effects in 'Affects & Presets'
my activities
Playing Fifa/ football with friends
Listening to music
cooking
Doing work
Watching Films
With the use of three screens I am going to play three different activities in different times of the day, to help fulfill the guild lines of the brief I going to include the use of text but use track motion to label the activity of each scene.
example (playing fifa)
Here's an example of how I would like to position each activity when filming. Facing directly towards the camera. I am also considering making the three videos more interactive by creating the illusion that each three characters (myself) on the screen are aware of each others existence. For example the Andre on the far left screen throw something towards the left and then appear in the screen on the far right then react. Which is just an idea I had to add some humor.
(An example of how my Time project will look)
Furthermore I want to include the effect of having static, so I have been looking at a few video tutorials on how to do it.
I then decided to see how it would look like when I apply it to my footage, I wanted to use this technique to begin the film, to make it seem like a tv turning on.
Overview of the ProjectThisis an individual projectthatshould enable you toexplore,researchandreflect onthe ideas/concept of “Time”.How cantimebe represented/expressed?Howhastimebeen explored in the arts before?Howwill timeaffect your future?What does Time mean to you?Howdoes Time affect you?What does time make you feel?From your research, findan timerelated subject or area thatinterestsyouandusing AdobeAfter Effects,Youwillplanandcreate a multi screenvisual piece of work comprising of 3x 1min loopedfilms thatwillbescreened simultaneously onthree separate PortraitHDscreens.Youmust detail your research ofboththeconceptandthe techniques youhave used tocreate the film, and evidence this throughan online BloggerBlog. This willbeassessed along with the final film againsttheunit
My Final chosen Idea each
screen will attempt to reflect a different part of who I am, my interests
hobbies likes and dislikes but will all be shot in different times of the day,
contributing to the primary theme of the project brief 'Time'. There will be a
repeated loop of me performing repeated actions that will appear on each
screen, each screen will be shot at different times of the day, one screen will
be shot in the morning another will be shot in the middle of the day and the
last screen will be filmed at night. Although each screen will be played at the
same time. They will appear to look like they are all interacting with each
other. For example I will walk out of frame in one screen and then will appear
to be walking in to frame in another screen, also as part of my persona I can
sometimes be deemed as annoying so in one screen I will attempt to annoy
another the other Andre on the opposite screen by like throwing something away
from the screen then will appear on the opposite screen . One of the main
themes that I wish to express through this project is conveying my emotion and
personality and using time as a tool to express that. I want the viewer to be able to connect with what I am portraying and be able to understand the message and concept of the film.
Inspiration
I have been inspired by many different works of art to help me decide on my chosen idea. The main component which I really intend on emphasizing is interactivity. And of course the use of multiple screens.
Pipilotti Rist: Pour Your Body Out (7354 Cubic Meters)
Pipilotti Rist's lush multimedia installations playfully and provocatively merge fantasy and reality. MoMA commissioned the Swiss artist to create a monumental site-specific installation that immerses the Museum's Marron Atrium in twenty-five-foot-high moving images. Visitors will be able to experience the work while walking through the space or sitting upon a sculptural seating island designed by the artist.
Paul Sermon & Andrea Zapp: Body of Water
A site-specific telematic installation linking the shower room of the Ewald/Schlaegel und Eisen mine in Herten with the Wilhelm Lehmbruck Museum in Duisburg. The images of visitors in the shower room in Herten are mixed with images of the Museum visitors in Duisburg and appear on one side of a water screen. Historical film footage of miners showering are projected onto the other side of the water screen. Realised for the Connected Cities Exhibition, Wilhelm Lehmbruck Museum Duisburg in Germany, June 20th to August 1st 1999 (catalogue printed).
Special Effects: Human Cloning and Camera Techniques
Regarding this video I do not particular want to use the clone effect for my video, however the way in which I will edit each video it will create the impression in which It looks like I use the cloning technique.
Arcade Fire - We Used To Wait
This is an amazing interactive video that provides you the ability to be involved with the video by including your own personal details so you become a lot more engaged with the content. Now this is not exactly how I am going to execute my project but I enjoy the techniques which they have used for this video
Test shots
playing Fifa 14 is one of my biggest past times, as I am a big fan of football. So as one of the screens I will be facing the screens holding the controller pad similar to the video above
1 Point Perspective Project Birds Eye View City
The second screen will be more of a birds eye view of me doing work, or perhaps the same style as the first video but doing a different activity
The third screen will demonstrate a visual of myself watching a movie, the same position as the previous videos, so they will be all aligned together and look symmetrical.
Schedule
17th - 23th I will begin to start finding the perfect location and attempt to start filming the 1st video and the 2nd Video
The second week I will begin to start filming the final video and start to experiment with different after effects techniques
Then after that I will begin to edit my footage and construct my 3 screened video
Requirements for Video
Adobe After Effects - masking
Adobe premiere pro - Editing
I do not require any models or actors as I will only be featuring on the video
Today's tutorial was focused on the importance of lighting when using photography in a studio
A Soft Box is used to illuminate a subject however a soft and subtle light upon the subject reducing the visibility of shadows and creating a diffused light. A soft box is an enclosure around a bulb comprising reflective side and back walls and a diffusing material at the front of the light.
We were also introduced to using an Umbrella light, which is pretty much shares the same functions and purpose of a soft box
Finally we were given the opportunity to compose and create a portrait picture of a subject which resembles the icon portrait of the late co founder of apple Steve Jobs.
The is the main light that illuminates your subject
The background lights are used to light the backdrop
House lights are names of the natural lighting in the room
Reflectors are used to bounce the light from the key light to help shine light upon the area in which the key light does not
A light reader which can be wirelessly connected to the key is used to measure and assess the amount of light is being produced to to shoot in the correct settings which aim to deliver the best results
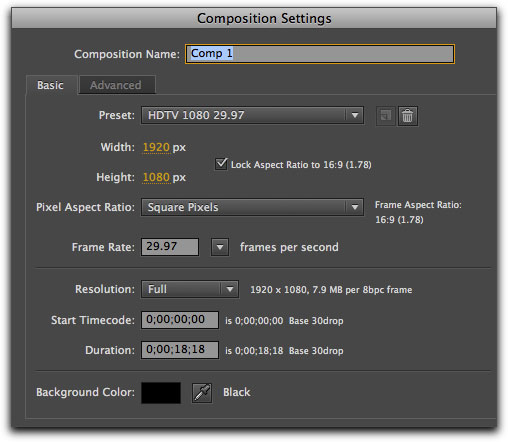
When creating a composition the frame rate must be set at 25 frame rates per second with a aspect ratio of 16:9
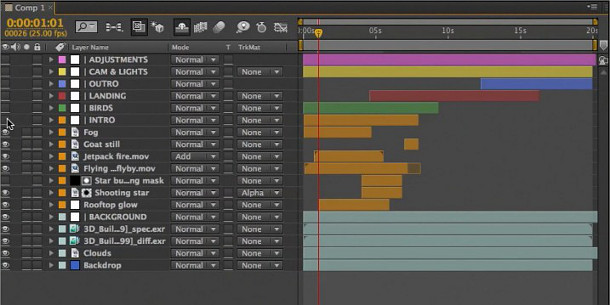
Similar to Photoshop and premiere pro individual content can be layered on top of each other, with the help of the various different blending options located near the timeline, this then effects visually how they all appear
Masking provides the ability to generate shapes and manipulate there movement also control and the movement and appearance of footage.
Masking can be used for
transitions
animating
creating special effects
When you have uploaded footage that appears to be a bit shaky and unstable, warp stabilizer allows you to keep the footage consistently stable and smooth, without any worry of any unexpected movement.
Summary
Although I am already comfortable using the visual effects software Adobe After Effects CS6 and now currently CC, it was refreshing to look over some of the tips and helpful information regarding how to operate the software. For example I did learn learn a lot more about the importance of RAM, frame rates and aspect ratios.